
Table of Contents
Set Token in cookies: Step by step
To set a token in cookies in a Next.js app using the App Router, you can use the `useEffect` hook to access the router events and set the token in cookies.
Here’s a step-by-step guide:
Step 1: Install `js-cookie` NPM package
First, make sure you have installed the `js-cookie` library as explained in the previous steps.
npm install js-cookie
Step 2: Create a Helper Function
If you haven’t already done so, create a helper function in a file named `cookies.js` in the `utils` directory to manage cookies:
// file: utils/cookies.js

import Cookies from 'js-cookie';

export const setCookie = (name, value) => {
    Cookies.set(name, value, {
        expires: 1, // Cookie will expire in 1 day (adjust as needed)
        path: '/', // The cookie will be accessible from all pages
        secure: process.env.NODE_ENV === 'production', // Use secure flag in production
        sameSite: 'strict', // Set sameSite attribute to strict
    });
};

export const getCookie = (name) => {
    return Cookies.get(name);
};

export const removeCookie = (name) => {
    Cookies.remove(name, { path: '/' });
};
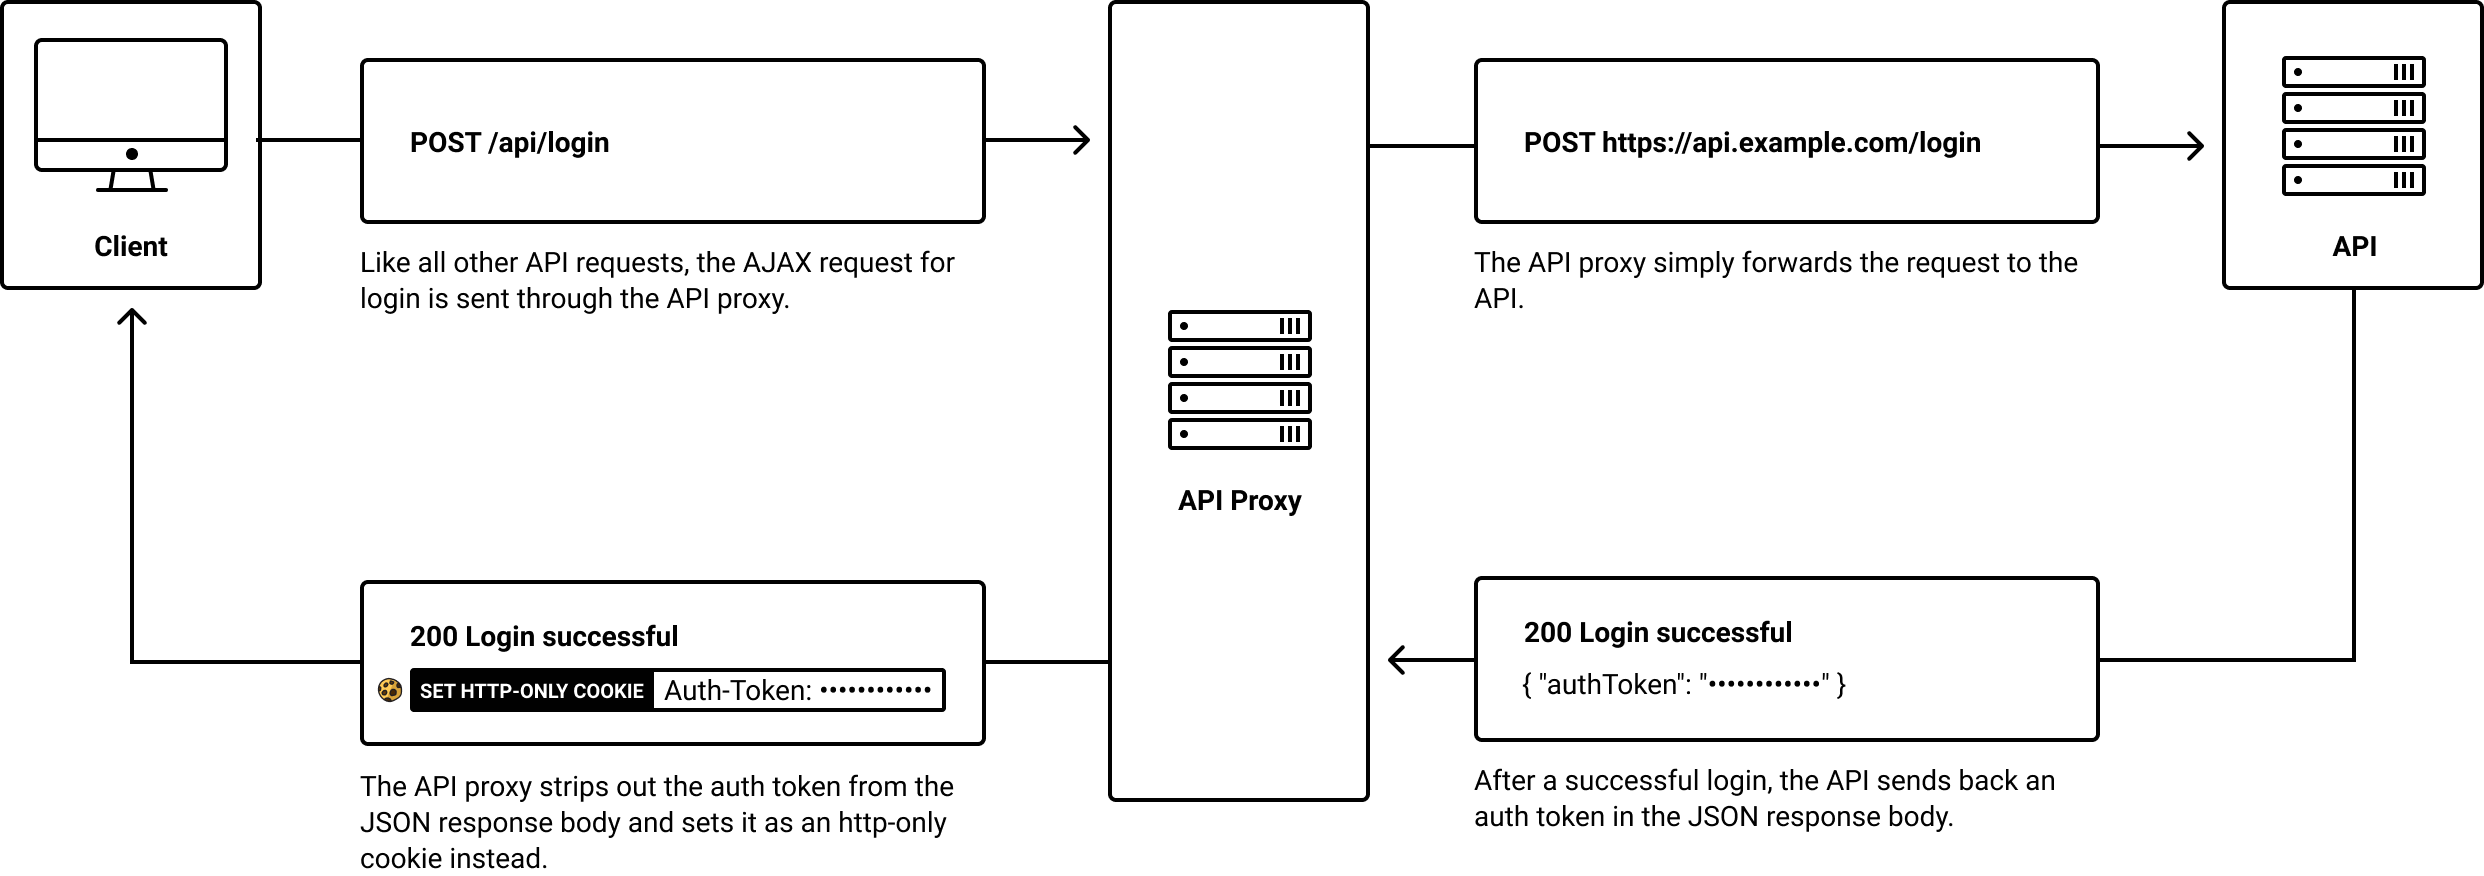
Step 3: Set Token in Cookies on Login
When the user logs in, you can set the token in cookies by using the `setCookie` function from the `cookies.js` helper:
// file: pages/login.js

import { useState } from 'react';
import { useRouter } from 'next/router';
import { setCookie } from '../utils/cookies';

const LoginPage = () => {
    const [formData, setFormData] = useState({
    email: '',
    password: '',
});

const router = useRouter();

const handleChange = (e) => {
    setFormData({
        ...formData,
        [e.target.name]: e.target.value,
    });
};

const handleSubmit = async (e) => {
    e.preventDefault();

    try {
        const response = await fetch('/api/login', {
            method: 'POST',
            headers: {
                'Content-Type': 'application/json',
            },
            body: JSON.stringify(formData),
        });

        const data = await response.json();

        if (response.ok) {
            // Save the token to a cookie
            setCookie('token', data.token);
           // Redirect to the dashboard or protected page
           router.push('/dashboard');
           } else {
           console.error('Login failed');
           // Handle error and display appropriate message
        }
    } catch (error) {
    console.error('Error occurred during login:', error);
    // Handle error and display appropriate message
    }
};

// Rest of the login component
};
Step 4: Remove Token on Logout
Similarly, you can use the `removeCookie` function from `cookies.js` to remove the token from cookies when the user logs out:
// Some logout component or function

import { removeCookie } from '../utils/cookies';

const handleLogout = () => {
    // Perform logout logic
    // ...

    // Remove the token from cookies
    removeCookie('token');
};
Step 5: Access Token from Cookies
In any other page or component, you can access the token from the cookie using the `getCookie` function from `cookies.js`:
// Some other page or component

import { getCookie } from '../utils/cookies';

const SomeComponent = () => {
const token = getCookie('token');

// Use the token as needed
};
With these steps, you can set the token in cookies during login, access it from other pages or components, and remove it during logout in your Next.js app using the App Router.
Thanks for your support please share this content to others…
Little bit About Next js
Next js is a popular open-source React framework that facilitates the development of modern web applications with a focus on performance, scalability, and ease of use. Introduced by Vercel, Next.js extends React’s capabilities by adding server-side rendering (SSR), static site generation (SSG), and other features, making it a versatile tool for building robust and dynamic web applications.
One of the key features of Next.js is its support for server-side rendering (SSR). With SSR, pages are rendered on the server and sent as HTML to the client, improving performance by delivering pre-rendered content. This is particularly beneficial for SEO, as search engines can easily index the content.
Next.js also supports static site generation (SSG), allowing developers to pre-render pages at build time. This enables faster loading times as static assets can be served directly from a Content Delivery Network (CDN). The framework provides flexibility by allowing developers to choose between SSR, SSG, or a combination of both based on the specific needs of each page.
The framework’s automatic code splitting feature ensures that only the necessary JavaScript is sent to the client, optimising the application’s performance. Additionally, Next js simplifies routing by offering a file-system-based approach, making it intuitive for developers to structure their projects.
Next js supports a wide range of data fetching methods, including fetching data at build time, request time, or a combination of both. This flexibility allows developers to manage data fetching according to the specific requirements of their applications.
In summary, Next.js simplifies React development by providing a powerful framework with built-in features like server-side rendering, static site generation, automatic code splitting, and an intuitive file-system-based routing system. This makes it a preferred choice for developers looking to create high-performance and scalable web applications.